
If you are considering using a gel stain for your next DIY project, check out these 10 helpful tips to decide if using gel stain is the right choice for you.

This post may contain affiliate links. You can read my full disclosure here.
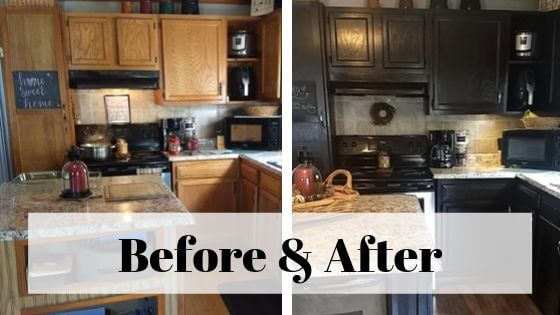
A year ago, I was scouring the internet for every tutorial and review I could find on using gel stain to update my kitchen cabinets on a budget. I was ready for a change in my kitchen as my old oak cabinets were looking tired and outdated.
Despite the glowing reviews of General Finishes gel stain, I was still hesitant to try it. Mostly, because I was terrified it would ruin my cabinets and I wouldn’t be able to afford to replace them.
After about a month, I finally took the plunge and ordered a quart of gel stain on Amazon, trusting everyone who said that was all I would need to update my kitchen.
And, I’m thrilled to say they were absolutely right. My kitchen cabinets received three coats of gel stain and I had enough leftover to do my kitchen tabletop and the bottom of my kitchen island.
If you would like to learn more about how I used gel stain to update my old honey oak kitchen cabinets, I share a step-by-step tutorial here- How to Gel Stain Your Cabinets on a Budget.
You may also like: How to Gel Stain a Kitchen Table
Needless, to say I was thrilled with the results. The coverage was fantastic as I was able to still see the natural wood grain underneath and the best part was that there was very little prep work.
I’m a DIY girl at heart but the thought of stripping and sanding my old furniture always kept me from trying to update it myself until I discovered gel stain.
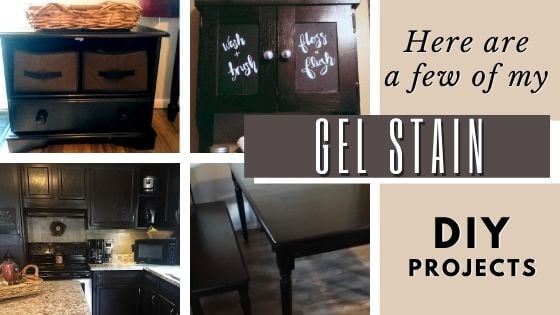
In fact, I was so happy with the gel stain. I went a little crazy, purchased another quart, and proceeded to gel stain my:
- Bathroom cabinets (previously painted brown)
- Kitchen chairs (previously black)
- Old TV Stand (honey oak) I turned into a storage bench (for our shoes) by adding some storage cubes from the Dollar Tree)
Before I share some of the best tips for using gel stain, I thought it would be helpful to share all the advantages and disadvantages to help you decide if a gel stain is right for you.
What is Gel Stain?
Gel stain is different than traditional stains because instead of soaking into the wood, it lays on the wood surface. It has a thicker consistency than paint as it basically looks and feels like pudding. Due to this, it’s forgiving and goes a long way.
Advantages of Gel Stain
- You can see the natural wood grain in gel stain unlike when you use paint.
- Heavy sanding is not required (but light sanding is recommended).
- Easily applied over an existing finish without a lot of prep work.
- Gel stain is very forgiving as it’s perfect for hiding imperfections.
- Great for vertical surfaces because of its thickness.
Disadvantages of Gel Stain
- Requires a long drying time as it can take up to 24 hours between coats (humidity and temperature can affect this).
- Requires a good cleaning of surfaces that may have an oily or greasy residue (from cooking or handling).
- It can appear streaky in the first and second coats.
- You need a lot of patience as it’s a long process overall.
10 Best Gel Stain Tips for Kitchen Cabinets
1. Clean your cabinets
Cleaning your cabinets is one of the most important steps to prepare your cabinets for gel stain. Cleaning them with TSP Cleaner usually is sufficient to remove dirt and grime. However, if there is a lot of grease build-up from cooking or handling then you may want to use a heavy-duty degreaser or a mixture of denatured alcohol and water (50/50) otherwise the gel stain may not adhere to your cabinets.
Although I didn’t experience this with my kitchen cabinets, it did happen on a door that I stained. When I attempted to apply a second coat, the first coat of gel stain came off despite letting it dry for almost 48 hours.
If this happens to you, simply use a stripping pad and a degreaser to clean the surface again and then reapply the gel stain.
2. Let your cabinets dry
After you have done a thorough cleaning on your cabinets, make sure that you allow them to dry for a bit before you apply gel stain as the excess moisture may not allow the gel stain to adhere.
3. Try a couple of application methods
If you have been doing any research about gel stain and the best way to apply it, you’ve probably read about a few different methods that people use such as a foam brush, sock, paintbrush, or soft cloth.
After trying both the foam brush and sock, I decided to use the sock method to apply my gel stain. I found it made it easier to control how much I was putting on so it wasn’t going on too thick in certain places.
If you are using a brush, it can sometimes build up around the crevices of your cabinets when you are applying it making it appear much darker in these areas. However, this can easily be remedied by using a soft cloth to wipe these areas down.
My suggestion is to purchase a couple of these options to see what application method works best for you.
4. Remove cabinet doors and hardware
Although, gel stain does have a thick consistency making it ideal for vertical surfaces. When it comes to applying it to your kitchen cabinets, you should take the time to remove all the cabinet doors and hardware to make the process go more smoothly.
Also, make sure to label and put all hardware in a ziplock bag for later.
5. Protect surfaces
Don’t forget to protect your surfaces. You can do this by putting down a drop cloth (or plastic tarp) and using masking tape to protect your floors and walls.
If you do happen to get a few drips here and there, mineral spirits will usually get it off.
6. Wear gloves
Gel stain can be hard to get off your hands, so use some nitrile gloves to protect them from spills. (However, I have used makeup remover wipes in a pinch to remove the gel stain from my hands).
7. Lightly sand existing finishes
Use a fine-grit sandpaper or sanding sponge to lightly sand the surface (less than 1 minute for cabinet doors). This will help the gel stain adhere better to your cabinets.
Don’t forget to wipe down the cabinets with a tack cloth to remove any sanding dust.
8. Apply thin coats
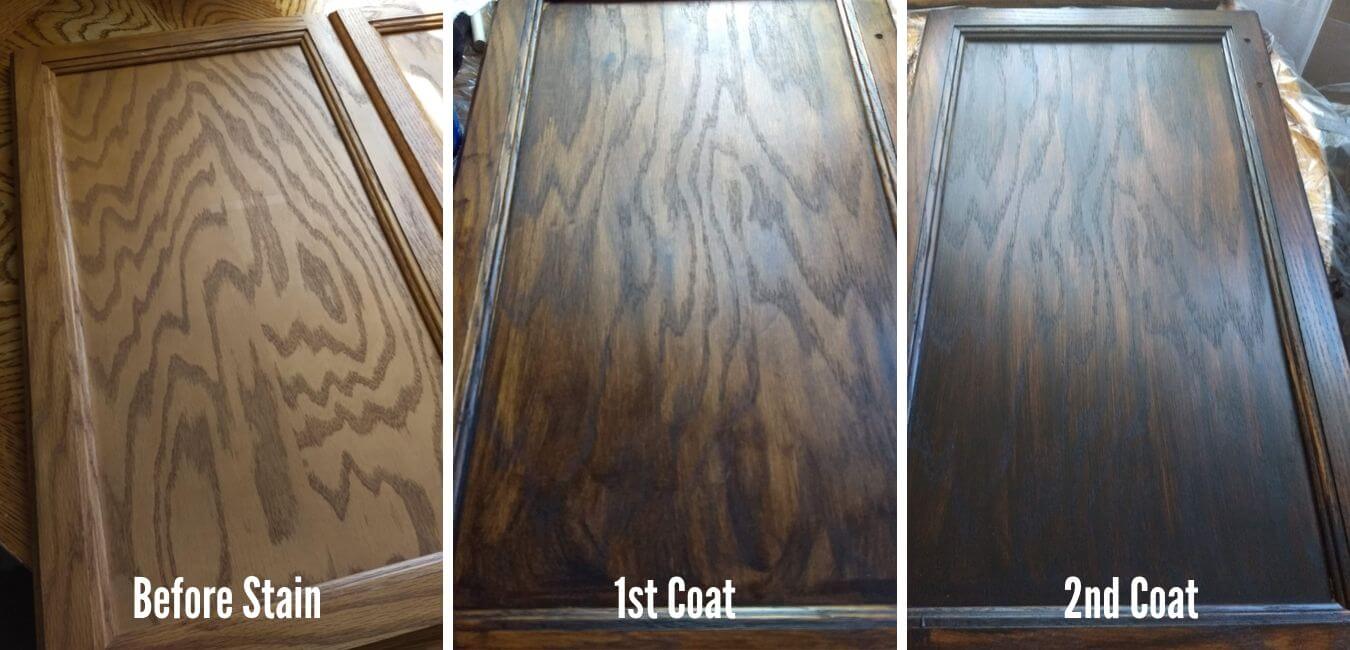
When you are applying your first coat, make sure you are putting on a thin coat. Apply a light, even stroke, and make sure to follow the grain.
Keep in mind the first coat will look streaky. So, don’t freak out. I promise it will get better with each application.
Apply additional coats until you have achieved your desired result.
9. Take your time
Gel staining your cabinets is a long process and it can take several days to complete. After applying your gel stain allow a full 24 hours to dry (It only took 12 hours after the second and third coats for my cabinets).
However, keep in mind that weather and high humidity can impact the drying time. If you are attempting to do the project when it’s colder or rainy. It may take even longer to dry.
10. Use a Polyurethane
After putting so much time and effort into your kitchen cabinets, you want them to last. So, protect all your hard work by applying a polyurethane. I purchased Minwax Wipe on Poly because of its ease of use. I put on 3 coats (waiting 12 hours between each coat).
It’s been an entire year since I’ve applied gel stain to my cabinets and I’m happy to say that they have held up remarkably well. Actually, even better than I had hoped. They still look as good as when I first applied the gel stain.
I’m hoping these gel stain tips have helped you decide whether gel stain is right for you. I’m sure if you decide to give it a try, you won’t be disappointed.
Don’t forget to check out my step-by-step process on how I used General Finishes gel stain to update my kitchen cabinets on a budget.

If you love printables-sign up for my Free Resource Library. You will find inspirational wall quotes to decorate your home and more.
Follow me on Pinterest for more ways to DIY on a budget.
