
Would you love an easy and inexpensive way to update your outdated honey oak cabinets without the hassle of stripping and sanding them? Learn how to gel stain your cabinets on a budget.

This post may contain affiliate links. You can read my full disclosure here.
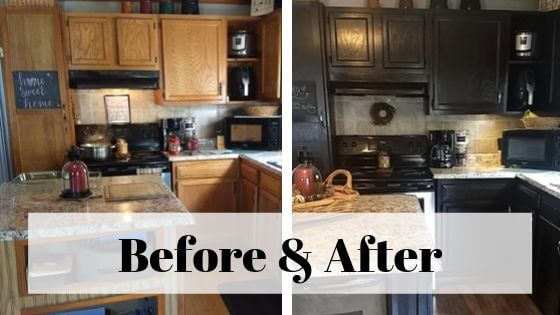
I have wanted to update my old and dated honey oak cabinets for many years but it wasn’t in the budget to completely replace them. So, I knew I had to look for an alternative to redo my kitchen without spending a fortune.
Recommended Posts:
I considered painting them but didn’t want to deal with the hassle of stripping them and sanding them down. To be honest, I was actually terrified of ruining them. After doing a little a lot of research, I came across General Finishes Gel Stain in the color Java.
I spend hours reading reviews and watching tutorials on YouTube. It was intimidating but everyone seemed to rave about how it was such an easy process and the results were fantastic. So, I finally built up the courage and ordered a quart and anxiously awaited its arrival.
It’s been almost a month since I’ve finished my cabinets and I am in love! I completely understand what everyone was raving about. The process was long but I’m so happy with how they turned out. If you looking for a simple way to stain your oak cabinets on a budget keep reading as I will walk you through step by step what I did to transform my kitchen cabinets.
How to Gel Stain Your Cabinets on a Budget
Before we get started, there are a few supplies that you are going to need. I got most of the supplies at the Dollar Tree with the exception of a few things I got through Amazon including the gel stain.
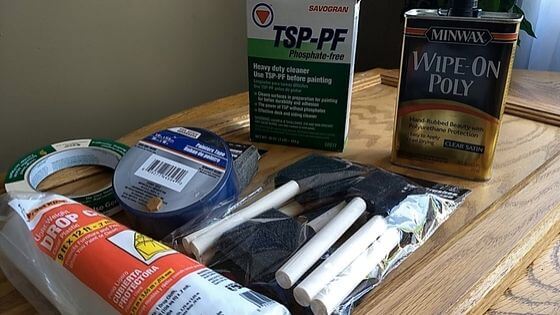
Supplies:
- Foam brushes or cotton socks (your preference)
I purchased both but I found the sock method easier to control the amount of gel stain that I put on my cabinets. - Tack Cloth
- Sanding Block
- TSP Cleaner
- Masking Tape
- Plastic Drop Cloth
- Nitrile Gloves
- General Finishes Gel Stain in Java
- Minwax Wipe on Poly
- Steel Wool (optional)
- Mineral spirits
Let’s get started
Step 1:
Remove all cabinet hardware and doors from cabinets.
Make sure to label and put all pieces in a ziplock bag for later.
Step 2:
Wipe down all the cabinets with the TSP cleaner to remove any dirt and grime.
If you have a lot of grease on your cabinets, you might want to look into getting a degreaser as well.
Step 3:
Use your sanding block to give the entire surface a light sanding just to scuff it up a very little.
I sanded each cabinet for less than 1 minute for both sides.
Step 4:
Wipe the cabinets down with a tack cloth to remove any sanding dust.
Step 5:
Use masking tape to protect the walls and floor from the gel stain.
Step 6:
Put on your nitrile gloves and sock or grab your foam brush and begin to apply your first coat.
Remember a thin coat is always better.
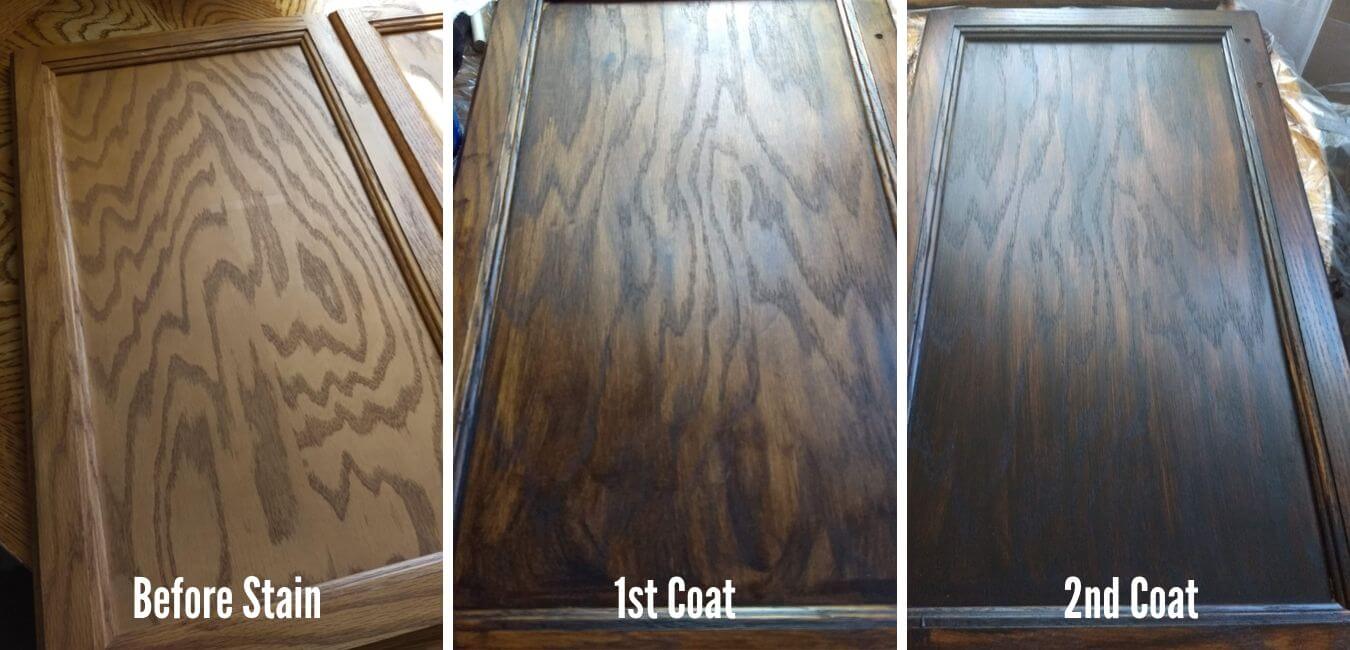
You should find it goes on amazingly well. The consistency of the gel stain is a mix of paint and stain. It’s not as thick as regular paint but thicker than stain, so it’s a nice in-between.
Step 7:
After applying the first coat, you will need to let it dry completely.
This can really vary on several factors including the time of year you are doing it. If it’s during the warmer months, they shouldn’t take as long to dry but it may take longer in the cooler months of the year.
The can of gel stain indicated it should be dry in 12-24 hours in ideal temperatures. I waited a full 24 hours before my second coat.
I waited 12 hours after that before I put on my 3rd coat which ended up being my last coat because I was happy with the color.
Step 8:
Use Poly to protect the cabinets.
I purchased a Minwax Wipe on Poly Satin Finish because it’s so easy to use.
I wanted something simple and this was exactly what I was looking for. You can use a cloth or another sock which is what I did and it went on so smoothly.
I waited 72 hours after I put my last coat of gel stain on my cabinets before putting on the wipe-on poly. I applied a second coat of Poly 24 hours later.
If you would like to see how I transformed our oak kitchen table with gel stain, you can check out my post- How to Gel Stain a Kitchen Table.
FAQ’s and Tips:
- Be aware that it will look streaky after your first coat and you may second guess yourself. I know I freaked out some but trust me it gets better and better with each coat. Be patient. It will be worth it.
- Unless you stain your cabinets and let dry in a warm room or at a warmer time of year, it will probably take longer than 12 hours. It may still be tacky after 24 hours and can take up to 48 hours to dry enough to put on another coat.
- I found that my second and third coats dried faster than my first coat. But, that could have been the warmer temperatures contributing to that.
- You can use a paintbrush, foam brush, or sock to apply the stain. I purchased foam brushes and socks (woman’s athletic socks) at the Dollar Tree because I wanted to try both. I preferred the sock because it was easier to get in the corners without adding too much stain.
- Remember to use easy, light strokes to apply the stain. It may take more coats but it will turn out better in the end.
- If you find it goes on thicker in some spots, you can use 0000 steel wool in between coats of stain to even out the finish.
- To give you an idea of how much it will cover: I used one quart of General Finishes Gel Stain to complete my kitchen.
There are 10 cabinets, 5 drawers, and a tall pantry that goes from the top of the cabinets to the floor. I also stained a door in our kitchen and our tabletop. The cabinets and table received 3 coats and the door only one since it was darker, to begin with. A little goes a long way.
- You can use mineral spirits if you spill the gel stain because it’s very hard to get out.
Recommended Posts:
- How to Gel Stain a Kitchen Table
- Quick Power Hour Cleaning Tips
- A Weekly Cleaning Routine that Works

Sign up for my Free Resource Library. You will find inspirational wall quotes to decorate your home and more.
Follow me on Pinterest for more ways to DIY on a budget.
